Techfullnews

How to Reset and Program Your GE Universal Remote: A Step-by-Step Guide

ge universal remote setup

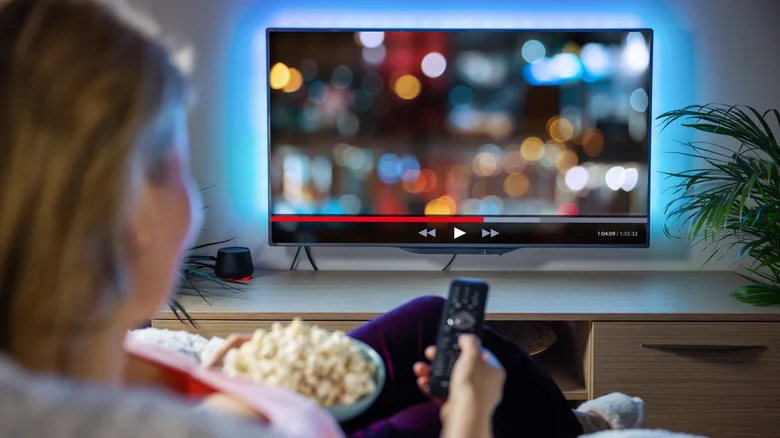
A universal remote is a lifesaver for anyone juggling multiple devices in their entertainment setup. Instead of fumbling with separate remotes for your TV, Blu-ray player, soundbar, or streaming device, a universal remote like the GE Universal Remote consolidates control into one convenient device. However, setting up and troubleshooting a universal remote can sometimes be tricky. Whether you’re resetting your remote to factory settings or programming it to control a new device, this guide will walk you through the process step by step.


Why Use a GE Universal Remote?

The GE Universal Remote is a popular choice for its versatility and ease of use. It can connect to a wide range of devices, including:

  • Smart TVs (Sony, Samsung, LG, etc.)
  • Blu-ray and DVD players
  • Soundbars and audio systems
  • Streaming devices (Roku, Apple TV, etc.)
  • Cable and satellite boxes

However, like most universal remotes, the GE model has a device limit—it can only control a set number of devices at once. If you’re having trouble connecting to a new device, it might be time to reset your remote or reprogram it. Here’s how to do both.


How to Reset Your GE Universal Remote to Factory Settings

Resetting your GE Universal Remote clears all programmed devices and restores it to its original state. This is useful if you’ve reached the device limit or if the remote isn’t functioning properly.

Step-by-Step Reset Instructions

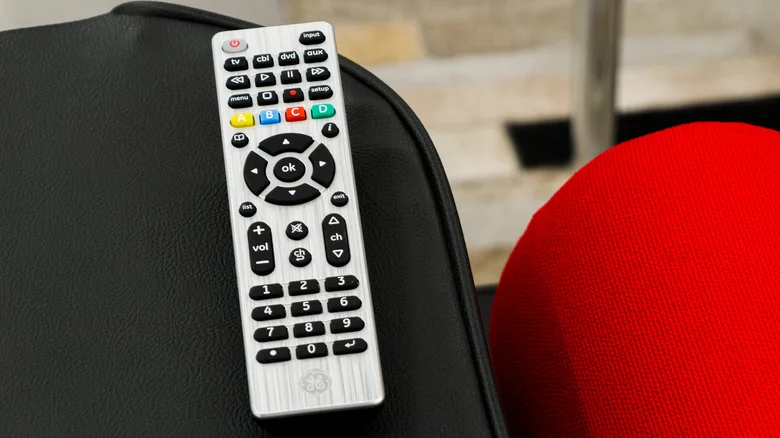
  1. Hold the Setup Button: Press and hold the Setup button until the red indicator light turns on. Then, release the button.
  2. Press the Mute Button: Tap the Mute button once.
  3. Enter the Reset Code: Press the #0 key on the remote.
  4. Confirm the Reset: The red light will flash twice to indicate the remote has been reset. If the light doesn’t flash, check the batteries or consider replacing the remote.

How to Program Your GE Universal Remote with a Code

Programming your GE Universal Remote with a device-specific code is the quickest and most reliable method. Here’s how to do it:

Step 1: Find Your Device Code

  • Check the Code List: Look for the code list included with your remote. It’s usually found in the user manual or under the battery compartment.
  • Search Online: If you don’t have the code list, visit a trusted online database like Universal Remote Reviews and search for your device’s manufacturer and model.

Step 2: Program the Remote

  1. Enter Setup Mode: Hold down the Setup button until the red light turns on, then release it.
  2. Select the Device Type: Press the button corresponding to the device you’re programming (e.g., TVCBLDVD, or AUX). The red light will blink once.
  3. Enter the Code: Using the number pad, input the four-digit code for your device.
  4. Test the Connection: Point the remote at your device and test its functionality. If it doesn’t work, repeat the process with another code from the list.

How to Program Your GE Universal Remote Without a Code

If you can’t find your device’s code, you can use the Auto Code Search feature to program your remote. This method is a bit more time-consuming but equally effective.

Step-by-Step Auto Code Search Instructions

  1. Turn On Your Device: Ensure the device you want to control is powered on.
  2. Enter Setup Mode: Hold the Setup button until the red light turns on.
  3. Select the Device Type: Press the button for the device you’re programming (e.g., TVDVDAUX, or CBL). The red light will blink once.
  4. Start the Auto Search: Point the remote at your device and press the Power button. The remote will send 10 codes to the device, with the red light blinking after each attempt.
  5. Wait for the Device to Turn Off: If the device powers off during the process, proceed to the next step. If not, repeat the process until it does.
  6. Save the Code: Once the device turns off, press the VOL + button. If the device turns off again, press the corresponding device button (e.g., TVDVD) to save the code.
  7. Test the Remote: Verify that the remote controls your device. If it works, the code has been successfully stored.

Tips for Troubleshooting Your GE Universal Remote

  • Check the Batteries: Weak or dead batteries can cause connectivity issues. Replace them if necessary.
  • Ensure Line of Sight: Make sure there are no obstructions between the remote and the device.
  • Update Firmware: Some GE Universal Remotes can be updated via USB or online. Check the manufacturer’s website for updates.
  • Clear Device Memory: If you’ve reached the device limit, reset the remote to free up space.

Why Choose a GE Universal Remote?

The GE Universal Remote is a versatile and affordable solution for simplifying your entertainment setup. Its ability to control multiple devices, combined with easy programming options, makes it a favorite among users. Whether you’re resetting, reprogramming, or troubleshooting, this guide ensures you’ll get the most out of your remote.


Simplify Your Entertainment Experience

A GE Universal Remote can transform your entertainment setup by consolidating control into one device. Whether you’re resetting it to factory settings, programming it with a code, or using the Auto Code Search feature, this guide provides all the steps you need to get started. With a little patience and these easy-to-follow instructions, you’ll be enjoying seamless control of your devices in no time.

ADVERTISEMENT
RECOMMENDED
NEXT UP

In a major win for smart home enthusiasts, SwitchBot has announced plans to integrate over 45 of its products with Home Assistant in the first half of 2024. This move, confirmed in an email to The Verge, underscores SwitchBot’s commitment to interoperability and user flexibility in the rapidly evolving smart home ecosystem. Among the highlighted devices is the highly anticipated SwitchBot Hub 3, which was recently revealed in a filing with the Connectivity Standards Alliance.

What’s New in SwitchBot’s Home Assistant Integration?

SwitchBot’s integration rollout, set to begin in April, will include some of its most popular devices, such as:

  • Robot Vacuum K10 Plus Pro: A powerful cleaning solution that can now be seamlessly controlled via Home Assistant.
  • Curtain 3 Smart Shades: Automate your window treatments with precision and ease.
  • Garage Door Opener: Add your garage to your smart home network for enhanced security and convenience.

These new integrations will join existing SwitchBot devices like the SwitchBot Lock Pro, which already supports Home Assistant. This expansion not only enhances the functionality of SwitchBot’s ecosystem but also solidifies its position as a leader in the smart home industry.

Why This Matters for Home Assistant Users

Home Assistant, an open-source platform beloved by tech-savvy users, thrives on its ability to unify devices from various brands under one roof. However, integrations with major smart home players can often be fragile. Companies sometimes make undocumented software changes or actively block third-party integrations, leaving users frustrated.

SwitchBot’s proactive approach to integrating its devices with Home Assistant is a breath of fresh air. By officially supporting these integrations, SwitchBot ensures a stable, reliable, and user-friendly experience. This is particularly important for Home Assistant users who value customization and control over their smart home setups.

The Bigger Picture: A Shift Toward Open Ecosystems

SwitchBot’s announcement reflects a growing trend in the smart home industry: the push for open ecosystems and interoperability. As more consumers demand seamless integration across devices, companies like SwitchBot are stepping up to meet these expectations. This move not only benefits users but also fosters innovation and competition in the market.

For Home Assistant users, this means greater flexibility and fewer headaches. Instead of relying on fragile community-created integrations, they can now enjoy official support for a wide range of SwitchBot devices. This is a win for both convenience and reliability.

What’s Next for SwitchBot and Home Assistant?

With the first wave of integrations launching in April, users can look forward to a more cohesive and powerful smart home experience. The inclusion of devices like the Robot Vacuum K10 Plus Pro and Curtain 3 Smart Shades demonstrates SwitchBot’s dedication to enhancing everyday life through technology.

As the smart home landscape continues to evolve, partnerships like this one between SwitchBot and Home Assistant will play a crucial role in shaping the future of connected living. For now, smart home enthusiasts have plenty to be excited about as SwitchBot brings its innovative products into the Home Assistant fold.

The MacBook Air has long been a symbol of sleek design, portability, and reliable performance. Since its inception, it has set the standard for ultraportable laptops, and Apple’s transition to its custom silicon chips—starting with the M1 in 2020—only solidified its dominance. Now, with the release of the MacBook Air M4, Apple continues to refine its flagship laptop. But is the M4 model worth the upgrade, especially if you already own an M2 or M3 MacBook Air? Let’s dive into the details to help you decide.


The Evolution of the MacBook Air: From M1 to M4

The MacBook Air’s journey has been nothing short of revolutionary. The introduction of the M1 chip in 2020 marked a turning point, delivering unprecedented performance and battery life in a fanless design. Since then, Apple has released the M2 and M3 models, each bringing incremental improvements. The latest M4 MacBook Air continues this trend, offering subtle yet meaningful upgrades.


Key Upgrades in the MacBook Air M4

  1. M4 Chip: A Performance Leap
    The most significant upgrade in the M4 MacBook Air is its 10-core M4 chip, up from the 8-core CPUs in the M2 and M3 models. Apple claims the M4 is up to twice as fast as the M1, making it a powerhouse for light to moderate tasks like web browsing, document editing, and even light creative work. However, if you’re coming from an M2 or M3 MacBook Air, the performance boost may not feel drastic enough to justify an upgrade.
  2. Increased Unified Memory
    The base model of the M4 MacBook Air now comes with 16GB of unified memory, a welcome upgrade from the 8GB offered in earlier models. This makes the M4 a more future-proof option, especially as software and applications become more resource-intensive.
  3. Triple-Display Support
    One of the standout features of the M4 MacBook Air is its ability to support two external displays without requiring the laptop lid to be closed. This is a game-changer for professionals who rely on multi-monitor setups. In contrast, the M1 and M2 models only support one external display natively, with workarounds like DisplayLink needed for additional monitors.
  4. Improved Webcam with Center Stage
    The M4 MacBook Air features a 12MP webcam with Center Stage, a feature that uses machine learning to keep you centered during video calls. While not groundbreaking, it’s a nice addition for remote workers and frequent video callers.
  5. Attractive Pricing
    Starting at $999, the M4 MacBook Air offers excellent value, especially considering the upgraded 16GB of RAM and 256GB of storage in the base model. This makes it a more compelling option than the M2 and M3 models, which initially launched at higher prices with lower base specifications.

What Stays the Same?

While the M4 brings some notable upgrades, many aspects of the MacBook Air remain unchanged:

  1. Design and Display
    The M4 MacBook Air retains the same sleek, lightweight design as its predecessors, with a 13.6-inch or 15.3-inch Liquid Retina Display. While the display is bright and vibrant, it lacks the Mini-LED and 120Hz ProMotion technology found in the MacBook Pro lineup.
  2. Battery Life
    All three models—M2, M3, and M4—boast an impressive 18-hour battery life. In real-world usage, you can expect a full day of productivity on a single charge.
  3. Ports and Connectivity
    The M4 MacBook Air continues to feature MagSafe charging and Thunderbolt 4 ports. It also supports Wi-Fi 6E, an upgrade over the Wi-Fi 6 in the M2 model.
  4. User Experience
    The M4 retains the Force Touch trackpad and Touch ID fingerprint scanner, both of which contribute to the MacBook Air’s premium user experience.

Should You Upgrade to the MacBook Air M4?

The answer depends on your current setup and needs:

  1. Upgrading from an M1 or Intel MacBook Air
    If you’re using an older MacBook Air, the M4 model is a significant upgrade. The performance boost, increased memory, and triple-display support make it a worthwhile investment.
  2. Upgrading from an M2 or M3 MacBook Air
    If you already own an M2 or M3 MacBook Air, the upgrades in the M4 model may not justify the cost. While the improved performance and triple-display support are nice-to-haves, they aren’t essential for most users.
  3. First-Time Buyers
    For first-time buyers or those switching from Windows laptops, the M4 MacBook Air is an excellent choice. Its combination of performance, portability, and value makes it one of the best ultraportable laptops on the market.

How Does the M4 Compare to Windows Laptops?

The MacBook Air M4 continues to outshine most Windows laptops in its category. While Windows laptops often force users to choose between portability and performance, the M4 MacBook Air delivers both. Its fanless designall-day battery life, and seamless integration with the Apple ecosystem give it a clear edge over competitors.


Final Verdict: Is the MacBook Air M4 Worth It?

The MacBook Air M4 is a refined and capable laptop that builds on the strengths of its predecessors. With its M4 chip16GB of unified memory, and triple-display support, it’s a compelling option for both new buyers and those upgrading from older models. However, if you already own an M2 or M3 MacBook Air, the incremental improvements may not be enough to warrant an upgrade.

For those seeking a lightweight, powerful, and future-proof laptop, the MacBook Air M4 is a fantastic choice. Its combination of performance, design, and value ensures it remains a top contender in the ultraportable laptop market.


Tips for Choosing the Right MacBook Air

  1. Assess Your Needs
    If you primarily use your laptop for browsing, streaming, and light productivity tasks, the M2 or M3 models may suffice. However, if you need more power for multitasking or creative work, the M4 is worth the investment.
  2. Consider Refurbished Models
    Apple’s Certified Refurbished store often offers older MacBook Air models at discounted prices. These devices are thoroughly tested and come with a warranty, making them a great budget-friendly option.
  3. Prioritize RAM and Storage
    While the base M4 model offers 16GB of RAM, consider upgrading if you plan to keep your laptop for several years. Similarly, investing in additional storage or using external SSDs can help future-proof your device.
  4. Explore Accessories
    Enhance your MacBook Air experience with accessories like the MagSafe chargerUSB-C hubs, and portable SSDs. These can help you get the most out of your laptop.

The MacBook Air M4 is a testament to Apple’s commitment to innovation and user experience. Whether you’re upgrading or buying for the first time, it’s a laptop that delivers on its promises, making it a worthy addition to your tech arsenal.

ADVERTISEMENT
Receive the latest news

Subscribe To Our Weekly Newsletter

Get notified about new articles