Techfullnews

How to Run Windows from a USB Drive: A Comprehensive Guide

windows usb/techfullnews

Running Windows directly from a USB drive is a game-changer for tech enthusiasts, professionals, and anyone who needs a portable, customizable operating system. Whether you want to test a new version of Windows, carry your personalized OS with your favorite apps and settings, or troubleshoot a system, this guide will walk you through the process step-by-step. Plus, we’ll share tips to optimize performance and ensure a seamless experience.


Why Run Windows from a USB Drive?

Running Windows from a USB drive offers several advantages:

  1. Portability: Carry your personalized Windows environment with you and use it on any compatible computer.
  2. Testing: Experiment with new versions of Windows without affecting your primary system.
  3. Troubleshooting: Use the USB drive to diagnose and fix issues on a malfunctioning PC.
  4. Privacy: Keep your files and apps secure on a portable drive, leaving no trace on the host computer.

However, it’s important to note that running Windows from a USB drive won’t match the performance of an internal SSD or HDD. The speed and responsiveness depend largely on the USB drive’s read/write speeds.


What You’ll Need

Before diving into the process, gather the following:

  1. A USB Drive: At least 16GB of storage is required, but 32GB or more is recommended for better performance. Opt for a USB 3.0 or higher drive for faster data transfer speeds.
  2. Windows ISO File: Download the Windows 10 or 11 ISO file from Microsoft’s official website.
  3. Rufus: A free, user-friendly tool to create a bootable USB drive.
  4. A Windows License Key: While not mandatory, activating Windows ensures full access to all features.
  5. BIOS Access: Ensure you can disable “Secure Boot” in your computer’s BIOS settings.

Step 1: Download the Windows ISO File

To create a bootable USB drive, you’ll need the Windows ISO file. Here’s how to download it:

For Windows 10:

  1. Visit the Windows 10 Download Page.
  2. Under the “Create Windows 10 Installation Media” section, click Download Now.
  3. Run the MediaCreationTool.exe file.
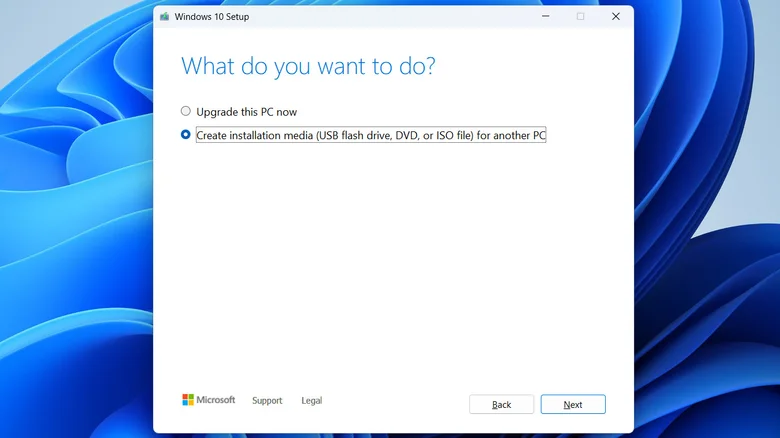
  4. Accept the terms and select Create installation media for another PC.
  5. Choose your preferred language, edition, and architecture (64-bit is recommended).
  6. Select ISO file and save it to your computer.

For Windows 11:

  1. Go to the Windows 11 Download Page.
  2. Scroll to the “Download Windows 11 Disk Image (ISO)” section.
  3. Select Windows 11 (multi-edition ISO) and click Download Now.
  4. Choose your language and click Download Now again.

Step 2: Create a Bootable USB Drive Using Rufus

Rufus is a reliable tool for creating bootable USB drives. Follow these steps:

  1. Download Rufus: Visit the official Rufus website and download the latest version.
  2. Plug in Your USB Drive: Ensure it’s empty, as the process will erase all data.
  3. Open Rufus: Launch the tool and select your USB drive under the Device dropdown.
  4. Select the ISO File: Click Select next to “Boot selection” and choose the Windows ISO file you downloaded.
  5. Choose “Windows To Go”: Under “Image option,” select Windows To Go. This option is specifically designed for running Windows from external drives.
  6. Start the Process: Leave other settings at their defaults and click Start.
  7. Wait for Completion: The process may take 15-30 minutes, depending on your USB drive’s speed.

Step 3: Boot Windows from the USB Drive

Once your bootable USB drive is ready, follow these steps to run Windows:

Method 1: Using the Boot Menu

  1. Insert the USB drive into the computer.
  2. Restart the PC and press the boot menu key (commonly F12, F11, Esc, or Delete) during startup.
  3. Select your USB drive from the boot menu and press Enter.

Method 2: Using Windows Settings (For Existing Windows Users)

  1. Press Windows + I to open Settings.
  2. Go to Update & Security (Windows 10) or System (Windows 11).
  3. Select Recovery and click Restart now under “Advanced startup.”
  4. After restarting, choose Use a device and select your USB drive.

Step 4: Set Up and Optimize Windows

When you boot Windows from the USB drive for the first time, you’ll need to complete the initial setup:

  1. Choose your language, region, and keyboard layout.
  2. Sign in with your Microsoft account or create a local account.
  3. Activate Windows using your license key (optional but recommended).

To optimize performance:

  • Use a high-speed USB 3.0 or higher drive.
  • Avoid running resource-intensive applications.
  • Regularly back up your data to prevent loss.

Limitations of Running Windows from a USB Drive

While convenient, running Windows from a USB drive has some drawbacks:

  1. Performance: Slower read/write speeds compared to internal drives.
  2. Durability: USB drives have limited write cycles, so frequent use may shorten their lifespan.
  3. Storage: Limited space may restrict the number of apps and files you can store.

Pro Tip: Use an External SSD for Better Performance

For a smoother experience, consider using an external SSD instead of a USB flash drive. SSDs offer faster speeds, greater durability, and more storage capacity, making them ideal for running Windows on the go.


Final Thoughts

Running Windows from a USB drive is a versatile solution for portability, testing, and troubleshooting. By following this guide, you can create a bootable USB drive and enjoy a personalized Windows experience on any compatible computer. While it may not replace your primary system, it’s a powerful tool to have in your tech arsenal.

Ready to get started? Download the Windows ISO file, grab a USB drive, and follow the steps above to create your portable Windows environment today!


Why Trust This Guide?
This guide is written by tech experts with years of experience in software and hardware optimization. We’ve tested every step to ensure accuracy and reliability, so you can follow along with confidence. Whether you’re a beginner or an advanced user, this guide is designed to help you succeed.

ADVERTISEMENT
RECOMMENDED
NEXT UP

In a major win for smart home enthusiasts, SwitchBot has announced plans to integrate over 45 of its products with Home Assistant in the first half of 2024. This move, confirmed in an email to The Verge, underscores SwitchBot’s commitment to interoperability and user flexibility in the rapidly evolving smart home ecosystem. Among the highlighted devices is the highly anticipated SwitchBot Hub 3, which was recently revealed in a filing with the Connectivity Standards Alliance.

What’s New in SwitchBot’s Home Assistant Integration?

SwitchBot’s integration rollout, set to begin in April, will include some of its most popular devices, such as:

  • Robot Vacuum K10 Plus Pro: A powerful cleaning solution that can now be seamlessly controlled via Home Assistant.
  • Curtain 3 Smart Shades: Automate your window treatments with precision and ease.
  • Garage Door Opener: Add your garage to your smart home network for enhanced security and convenience.

These new integrations will join existing SwitchBot devices like the SwitchBot Lock Pro, which already supports Home Assistant. This expansion not only enhances the functionality of SwitchBot’s ecosystem but also solidifies its position as a leader in the smart home industry.

Why This Matters for Home Assistant Users

Home Assistant, an open-source platform beloved by tech-savvy users, thrives on its ability to unify devices from various brands under one roof. However, integrations with major smart home players can often be fragile. Companies sometimes make undocumented software changes or actively block third-party integrations, leaving users frustrated.

SwitchBot’s proactive approach to integrating its devices with Home Assistant is a breath of fresh air. By officially supporting these integrations, SwitchBot ensures a stable, reliable, and user-friendly experience. This is particularly important for Home Assistant users who value customization and control over their smart home setups.

The Bigger Picture: A Shift Toward Open Ecosystems

SwitchBot’s announcement reflects a growing trend in the smart home industry: the push for open ecosystems and interoperability. As more consumers demand seamless integration across devices, companies like SwitchBot are stepping up to meet these expectations. This move not only benefits users but also fosters innovation and competition in the market.

For Home Assistant users, this means greater flexibility and fewer headaches. Instead of relying on fragile community-created integrations, they can now enjoy official support for a wide range of SwitchBot devices. This is a win for both convenience and reliability.

What’s Next for SwitchBot and Home Assistant?

With the first wave of integrations launching in April, users can look forward to a more cohesive and powerful smart home experience. The inclusion of devices like the Robot Vacuum K10 Plus Pro and Curtain 3 Smart Shades demonstrates SwitchBot’s dedication to enhancing everyday life through technology.

As the smart home landscape continues to evolve, partnerships like this one between SwitchBot and Home Assistant will play a crucial role in shaping the future of connected living. For now, smart home enthusiasts have plenty to be excited about as SwitchBot brings its innovative products into the Home Assistant fold.

The MacBook Air has long been a symbol of sleek design, portability, and reliable performance. Since its inception, it has set the standard for ultraportable laptops, and Apple’s transition to its custom silicon chips—starting with the M1 in 2020—only solidified its dominance. Now, with the release of the MacBook Air M4, Apple continues to refine its flagship laptop. But is the M4 model worth the upgrade, especially if you already own an M2 or M3 MacBook Air? Let’s dive into the details to help you decide.


The Evolution of the MacBook Air: From M1 to M4

The MacBook Air’s journey has been nothing short of revolutionary. The introduction of the M1 chip in 2020 marked a turning point, delivering unprecedented performance and battery life in a fanless design. Since then, Apple has released the M2 and M3 models, each bringing incremental improvements. The latest M4 MacBook Air continues this trend, offering subtle yet meaningful upgrades.


Key Upgrades in the MacBook Air M4

  1. M4 Chip: A Performance Leap
    The most significant upgrade in the M4 MacBook Air is its 10-core M4 chip, up from the 8-core CPUs in the M2 and M3 models. Apple claims the M4 is up to twice as fast as the M1, making it a powerhouse for light to moderate tasks like web browsing, document editing, and even light creative work. However, if you’re coming from an M2 or M3 MacBook Air, the performance boost may not feel drastic enough to justify an upgrade.
  2. Increased Unified Memory
    The base model of the M4 MacBook Air now comes with 16GB of unified memory, a welcome upgrade from the 8GB offered in earlier models. This makes the M4 a more future-proof option, especially as software and applications become more resource-intensive.
  3. Triple-Display Support
    One of the standout features of the M4 MacBook Air is its ability to support two external displays without requiring the laptop lid to be closed. This is a game-changer for professionals who rely on multi-monitor setups. In contrast, the M1 and M2 models only support one external display natively, with workarounds like DisplayLink needed for additional monitors.
  4. Improved Webcam with Center Stage
    The M4 MacBook Air features a 12MP webcam with Center Stage, a feature that uses machine learning to keep you centered during video calls. While not groundbreaking, it’s a nice addition for remote workers and frequent video callers.
  5. Attractive Pricing
    Starting at $999, the M4 MacBook Air offers excellent value, especially considering the upgraded 16GB of RAM and 256GB of storage in the base model. This makes it a more compelling option than the M2 and M3 models, which initially launched at higher prices with lower base specifications.

What Stays the Same?

While the M4 brings some notable upgrades, many aspects of the MacBook Air remain unchanged:

  1. Design and Display
    The M4 MacBook Air retains the same sleek, lightweight design as its predecessors, with a 13.6-inch or 15.3-inch Liquid Retina Display. While the display is bright and vibrant, it lacks the Mini-LED and 120Hz ProMotion technology found in the MacBook Pro lineup.
  2. Battery Life
    All three models—M2, M3, and M4—boast an impressive 18-hour battery life. In real-world usage, you can expect a full day of productivity on a single charge.
  3. Ports and Connectivity
    The M4 MacBook Air continues to feature MagSafe charging and Thunderbolt 4 ports. It also supports Wi-Fi 6E, an upgrade over the Wi-Fi 6 in the M2 model.
  4. User Experience
    The M4 retains the Force Touch trackpad and Touch ID fingerprint scanner, both of which contribute to the MacBook Air’s premium user experience.

Should You Upgrade to the MacBook Air M4?

The answer depends on your current setup and needs:

  1. Upgrading from an M1 or Intel MacBook Air
    If you’re using an older MacBook Air, the M4 model is a significant upgrade. The performance boost, increased memory, and triple-display support make it a worthwhile investment.
  2. Upgrading from an M2 or M3 MacBook Air
    If you already own an M2 or M3 MacBook Air, the upgrades in the M4 model may not justify the cost. While the improved performance and triple-display support are nice-to-haves, they aren’t essential for most users.
  3. First-Time Buyers
    For first-time buyers or those switching from Windows laptops, the M4 MacBook Air is an excellent choice. Its combination of performance, portability, and value makes it one of the best ultraportable laptops on the market.

How Does the M4 Compare to Windows Laptops?

The MacBook Air M4 continues to outshine most Windows laptops in its category. While Windows laptops often force users to choose between portability and performance, the M4 MacBook Air delivers both. Its fanless designall-day battery life, and seamless integration with the Apple ecosystem give it a clear edge over competitors.


Final Verdict: Is the MacBook Air M4 Worth It?

The MacBook Air M4 is a refined and capable laptop that builds on the strengths of its predecessors. With its M4 chip16GB of unified memory, and triple-display support, it’s a compelling option for both new buyers and those upgrading from older models. However, if you already own an M2 or M3 MacBook Air, the incremental improvements may not be enough to warrant an upgrade.

For those seeking a lightweight, powerful, and future-proof laptop, the MacBook Air M4 is a fantastic choice. Its combination of performance, design, and value ensures it remains a top contender in the ultraportable laptop market.


Tips for Choosing the Right MacBook Air

  1. Assess Your Needs
    If you primarily use your laptop for browsing, streaming, and light productivity tasks, the M2 or M3 models may suffice. However, if you need more power for multitasking or creative work, the M4 is worth the investment.
  2. Consider Refurbished Models
    Apple’s Certified Refurbished store often offers older MacBook Air models at discounted prices. These devices are thoroughly tested and come with a warranty, making them a great budget-friendly option.
  3. Prioritize RAM and Storage
    While the base M4 model offers 16GB of RAM, consider upgrading if you plan to keep your laptop for several years. Similarly, investing in additional storage or using external SSDs can help future-proof your device.
  4. Explore Accessories
    Enhance your MacBook Air experience with accessories like the MagSafe chargerUSB-C hubs, and portable SSDs. These can help you get the most out of your laptop.

The MacBook Air M4 is a testament to Apple’s commitment to innovation and user experience. Whether you’re upgrading or buying for the first time, it’s a laptop that delivers on its promises, making it a worthy addition to your tech arsenal.

ADVERTISEMENT
Receive the latest news

Subscribe To Our Weekly Newsletter

Get notified about new articles